Is Your Home Suffering from Silent Mineral Damage? How to cultivate perfectly soft water.
Have you ever noticed strange white buildup on your faucets, felt like your hair is perpetually dull, or battled with itchy skin after a shower? These are classic signs of an invisible thief in your home: hard water. This common issue, caused by excessive calcium and magnesium, doesn’t just irritate—it corrodes pipes, ruins appliances, and wastes energy. The solution isn’t just a quick fix; it’s about installing a system that cultivates pure, soft water throughout your entire home. This comprehensive guide demystifies water softeners, walking you through selection, installation, and care to protect your investment and elevate your daily living. By the end, you’ll understand exactly how to create a hard water-free sanctuary.
Materials & Supplies
To successfully install and maintain a whole-house water softeners system, you’ll need the following. Always check your specific model’s manual first.
- Core System: A correctly sized ion-exchange water softeners unit (based on your home’s hard water grain capacity and daily water usage).
- Tools: Pipe wrench, tubing cutter, soldering torch (if using copper), Teflon tape, adjustable wrenches, screwdriver, drill, pipe thread sealant.
- Supplies: Bypass valves (often included), copper or PEX piping and fittings, drain line (for brine discharge), electrical outlet (if powered), salt (typically sodium chloride pellets or potassium chloride).
- Safety Gear: Gloves, safety glasses.
- Optional but Recommended: A sediment pre-filter to protect the softener’s resin bed, a water testing kit to verify hard water levels before and after installation.
- Alternative for Renters/Small Spaces: Consider a point-of-use water softeners system for just the shower, or a salt-free conditioner (though these don’t remove minerals, they alter their structure).
Timing / Growing Schedule
- Prep Time (1-2 Days): Water Softeners This includes testing your water, measuring pipe sizes, purchasing the correct unit, and gathering tools. The physical installation itself typically takes 4-8 hours for a competent DIYer with plumbing experience. Professionals can often complete it in 2-4 hours.
- Growth/Regeneration Period (Ongoing): The system doesn’t “grow” but operates on a regeneration cycle (usually every 7-14 days, programmable). This process, where salt brine flushes the resin bed, takes about 2 hours and is scheduled for off-peak hours (e.g., 2 AM).
- Expected Results: You will notice the benefits immediately after the first regeneration cycle. Soap will lather better, dishes will spot-free, and skin/hair will feel softer. The full protective effect on pipes and appliances accumulates over weeks and months, significantly extending their lifespan compared to life with untreated hard water.
Step-by-Step Instructions
1. Shut Off & Drain: Water Softeners Turn off the main water supply and electricity to the water heater. Open a lower faucet to drain pressure and water from pipes.
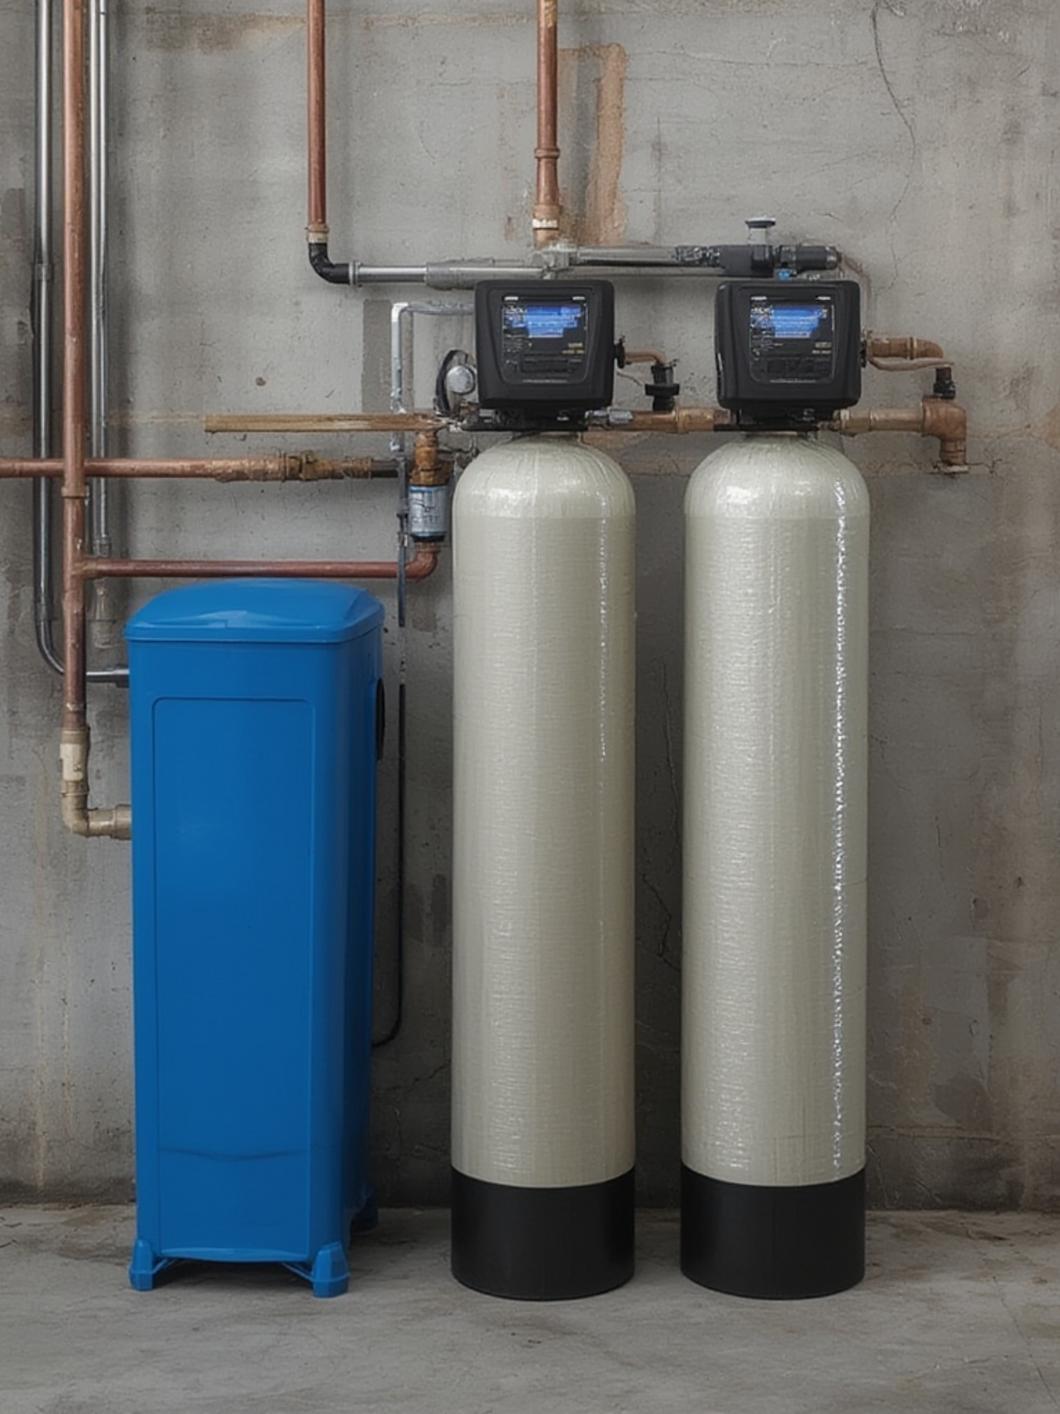
2. Choose Location: Install near the main water line before the water heater, on a level, dry surface with a floor drain nearby for the brine discharge. Ensure there’s an electrical outlet.
3. Cut & Install Bypass: Cut the main cold water line. Install the water softeners unit with its provided bypass valves. Use the bypass to isolate the unit for future maintenance without shutting down the whole house.
4. Connect Piping: Connect the “inlet” and “outlet” pipes to the bypass manifold as directed (IN, OUT, drain). The drain connection is critical for proper brine flow during regeneration.
5. Connect Overflow & Brine Tank: Connect the overflow tube (to prevent flooding) and the brine line (from the water softeners head to the salt tank). Ensure a downward air gap at the drain.
6. Set Up & Program: Fill the brine tank with salt and several gallons of water. Turn on the water slowly to check for leaks. Plug in the unit and program it according to your specific hard waterlevels and household size. This step is vital for efficiency.
7. Flush & Regenerate: Open a cold faucet to flush air and debris for 10 minutes. Initiate a manual regeneration to sieve the resin bed and prime the system. Test water softness after completion.
Pro Tip: Install a sediment filter upstream of the softener to prevent fine particles from fouling the resin bed.
Nutritional Benefits / Advantages
While not a food, the benefits of treated water are deeply “nutritional” for your home and health. Water softeners remove scale-forming minerals, which:
- For You & Family: Eliminates mineral film on skin and hair, leading to softer skin, shinier hair, and reduced use of lotions and shampoos. It prevents soap scum, making cleaning easier and reducing exposure to chemical cleaners.Water Softeners
- For Appliances: Protects water heaters, dishwashers, washing machines, and kettles from scale buildup, a primary cause of reduced efficiency and failure. This can improve energy efficiency by up to 29% for water heaters and extend appliance life by years.
- For Your Infrastructure: Prevents clogging and corrosion in pipes and fixtures, maintaining water pressure and plumbing health, saving thousands in potential repair costs.
Tips, Alternative Methods & Gardening Advice
- Alternative Methods: For areas with low to moderate hard water, a salt-free, template-assisted crystallization (TAC) system can be a low-maintenance, eco-friendly alternative (though it doesn’t remove minerals, it prevents scaling). For single fixtures, inline shower filters are a temporary fix.
- Small Spaces/Renters: Look for compact, portable water softeners designed for RVs or apartments. These are smaller, often cartridge-based systems.
- Climate/Seasonal: In very cold climates, ensure the brine tank and pipes are in a conditioned space to prevent freezing. No seasonal adjustment is typically needed for the system itself.
- Organic Approach: Water Softeners While traditional salt-based systems use sodium, you can opt for potassium chloride salt, which is a plant nutrient and better for those on low-sodium diets or with sodium-sensitive landscaping.
Common Mistakes to Avoid
1. Undersizing the Unit: Water Softeners The #1 error. A unit too small will constantly regenerate, waste salt, and fail to soften all your water. Solution: Calculate your hard water grain capacity and peak demand correctly.
2. Poor Drain Setup: A kinked, high, or undersized drain hose can cause brine backup and system failure. Solution: Use a large-diameter hose with a steady downward slope and an air gap at the drain.
3. Ignoring Pre-Filters: Sediment and iron can quickly foul the resin bed. Solution: Install a 5-micron sediment pre-filter and change it regularly.
4. Using the Wrong Salt: Rock salt contains impurities that can foul the tank. Solution: Always use clean, white pellets or crystals labeled for water softeners.
5. Incorrect Programming: Failing to set the correct hard water level, salt dosage, and regeneration time. Solution: Read the manual thoroughly and use your water test results to program accurately.
Storage / Maintenance Tips
- Routine: Check salt levels monthly and keep the brine tank at least half full. Perform a deep clean of the brine tank every 6-12 months. Inspect for salt bridges (a hard crust) and break them up.
- Resin Bed: The resin lasts 10-15 years. A drop in soft water performance can indicate it’s time for replacement or a professional cleaning.
- Seasonal: In winter, ensure any outdoor components or pipes are insulated. For vacation homes, set the system to “vacation mode” to prevent unnecessary regenerations.
- Storage (if unit is unused): Drain all water, disconnect power, and store in a dry, frost-free location. Protect from dust.
Conclusion
Investing in a properly selected, installed, and maintained water softeners system is one of the most impactful upgrades for your home’s longevity, efficiency, and your family’s comfort. It directly combats the relentless wear and tear of hard water, transforming everything from your morning shower to your monthly utility bills. By understanding the process—from sizing and installation to the critical step of programming for your unique hard water conditions—you take control of your home’s water quality. The result is a seamless flow of soft water that protects your investment and simplifies your life. Ready to experience the difference? Explore effective solutions and potential savings with these curated Water Softeners deals and start combating your hard water problems today.
FAQs
1. How do I know if I really need a water softener?
Get a professional water test or use a reliable home test kit. If your hardness is above 7 grains per gallon (GPG), a softener is highly recommended to prevent scale. Signs include spotted dishes, soap scum, low water pressure, and appliance inefficiency.
2. Can I drink softened water?
Yes. Softened water has slightly elevated sodium (or potassium) levels, but it’s typically negligible—far less than a slice of bread. Those on strict sodium-restricted diets should use a potassium-based salt or a reverse osmosis drinking water system for cooking/drinking.
3. How much salt and water does a regeneration use?
It varies by model and hardness, but a typical regeneration uses 25-50 lbs of salt and 50-100 gallons of water. Modern, efficient models use significantly less. This is a small price for the appliance savings.
4. Why is my water softener not using any salt?
First, check for a salt bridge (a hard crust in the tank). Second, ensure the unit is actually regenerating (listen for cycles). Third, verify your programming settings and hard water levels. A failed brine valve or float can also cause this.
5. What’s the difference between a water softener and a conditioner?
A true ion-exchange water softener removes calcium and magnesium minerals. A “conditioner” (or descaler) uses various technologies (like TAC or electromagnetic) to alter mineral structure so they don’t stick, but they remain in the water. Conditioners don’t provide the same lathering or full-scale protection.